Quantcast
Channel: Northern Pecans
Viewing all 395 articles
Browse latest View live

Which Kanza trees need thinning this year?

$
0
0
    If you are a long time reader of this blog, you may recall that we have been thinning a block of Kanza trees a little bit each year for the past several years. Today, I took advantage of the warm sunshine to walk through our Kanza block and mark trees for removal this winter.
   In some areas of this 3 acre block of trees the canopies of adjacent trees are beginning to almost touch (photo above, right). In these areas, I flagged some trees for removal.

   But just a couple of tree rows away, trees have not grown as fast and adjacent trees still have plenty of room to grow (photo at left). You might be wondering why, in such a relatively small area (3 acres), are our Kanza trees growing at such different rates. The answers is simple--small changes in soil conditions. All the trees in this block are growing in a soil classified as Osage Silty Clay. However, all soil types contain minor variations that can effect tree growth. The fastest growing trees in this block are growing in areas that are slightly more silty. In contrast, the slowest growing trees are found in soil with more clay.

The initial tree spacing for this orchard was 30 feet by 30 feet. We started thinning this grove in 2012. After thinning, the trees are left at a 42 foot by 42 foot spacing (photo at right). As you can see, the canopies of adjacent trees have ample room intercept sunlight and grow new nut bearing wood.
    After walking the grove today, I marked 9 trees for removal this winter. The blog posts listed below will give you the history of our thinning program in this block of Kanza trees.

2012 Making the decision to thin Trees 
2012 Thinning a Kanza Block
2014 Early spring thinning
2015 Time to think about tree thinning 
2015 Sticking to the plan

Pecan cultivars and tree size

$
0
0
    In setting out a new pecan cultivar trial, I anxiously wait for the trees to start bearing so I can record nut production data. Nut size, percent kernel, flowering type, maturity date, yield, and disease resistance are all among the key cultivar attributes that can define cultivar success. However, not all cultivar characteristics are revealed within the first decade of nut bearing.
    I was walking through the oldest cultivar trial on the research station when  I noticed obvious cultivar differences in over-all tree size. In the photo above, you can see that Major produced a much larger tree than Dooley. Both cultivars were grafted onto Giles seedling rootstock planted in the field back in 1981. The only difference between these two trees is the scion cultivar. 


    Looking around this 35-year-old trial, I found that trunk diameter was largely a function of cultivar. To create a visual record of cultivar differences in trunk diameter, I photographed the trunks of 6 pecan cultivars placing a one-foot-long ruler across the truck for scale (photo above ). Major and Peruque grew trees so large they seem to dwarf all others in comparision. Colby and Posey grew moderate sized trees while trees grafted to Giles or Dooley seemed small in comparison.
   I would never consider tree size a very important tree characteristic in making cultivar decisions. However, tree growth rate becomes important when planning initial orchard spacing and making subsequent thinning decisions. Large growing trees, like Major or Peruque, should be established at a wider spacing--let say, 40 feet rather than the standard 35 feet. Tree growth rate will also influence tree thinning decisions. The larger a tree grows, the sooner you will need to thin out adjacent trees to make room for future growth.
    It takes at least 30 years of cultivar testing to make accurate tree size determinations. In that time, many cultivars will prove unworthy of future propagation. Of the six cultivars pictured above, I would consider grafting only Major because of its scab resistance and regular nut production. But now, when I graft new Major trees, I'll also be sure to allow more space for these trees to grow.  

Making pecan breeding plot selections

$
0
0
     To many pecan growers, thinning a pecan orchard is the hardest job they will ever have to accomplish. Cutting down trees that required so many years of work to grow seems heartbreaking. But over the weekend, I started thinning trees in our pecan breeding plot (photo above). This is more than just a simple tree thinning operation. I was making tree by tree decisions of which trees were worth saving and which would be eliminated from the breeding project.

    Many trees in the breeding plot have now produced nuts for three years giving us a good idea about nut size and percent kernel for each tree. As you would expect, the nuts produced by a field of seedling trees varies widely. The photo above shows nuts produced by three trees in our breeding plot. The nut at the far left weighed 8.17g and yielded 58.61% kernel. This is one tree I definitely needed to save. The football shaped nut in the center produced a very attractive but small kernel. However, at only 4.54g and 47.29% kernel, I choose to cut down this tree. At the far right, this small 4.99g nut had a thin shell (53.67% kernel) but the nut was way to small to remain in the trial.

    Not all tree removal decisions were based solely on nut size and percent kernel. I choose to remove trees that produced kernels with serious defects and trees that exhibited severe susceptibility to pecan scab. The photo above illustrates one kind of kernel defect that warrants tree removal. The nut on the right is marked with very unattractive dark brown mottles. Compared to the bright straw-colored kernel at left, it is easy to see which nut would be attractive to consumers (left nut) and which tree needed to be removed (right nut).

Thinning trees from a Kanza block

$
0
0
    In keeping with our plan to gradually thin our block of Kanza trees, I cut down nine trees yesterday (photo at right).  We started thinning this block of 144 trees back in 2012, removing 5 to 9 trees each year since that time. So far we have removed a total of 34 trees in 5 years time.

    The map at left shows the position of the trees we removed in 2016. Each green circle represents a tree with the diameter of the circle proportional the the diameter of the tree. The black circles represent trees removed this week.
    So far I've been pleased this this progressive approach to orchard thinning. By removing just a few trees each year we have been able to prevent orchard overcrowding while maintaining total orchard yield. You can review the yield and tree removal history of this block of Kanza trees in this post:

Kanza nut yield for 2015

Orchard thinning yields great scionwood.

$
0
0
    February is a good month for thinning pecan orchards. It is also a good month for collecting pecan scionwood. So today, we took advantage of the sunny weather to collect scions from the trees we cut during a orchard thinning operation (photo at right).

   Once a tree is cut down, you can ready see why it is so hard to find good scions from nut bearing trees. On lower and mid-canopy limbs, new shoot growth is limited by nut production. The photo at left shows a typical lower-canopy branch. Last year's growth is highlighted by the yellow line and extends about 5 inches before terminating in a peduncle or the former fruit bearing stalk. Note that last year's shoot growth is lighter in color and displays large, prominent buds. However, this shoot does not make for very good scionwood. The growth is short, the buds are close together, and the stem is crooked. 
    Walking around to the top of the tree, I found really long, healthy shoots that would make great scions (photo at right). What was once 40 feet up at the very top of the tree, was now easily accessible from the ground.

   I cut dozens of one-year-old shoots that measured nearly 3 feet in length (photo at right). This is the perfect type of wood for cutting into scions. 


    Taking the 34 inch shoot pictured above, I cut the wood into pieces. In the photo at left, I've arranged the wood from the lowest portion of the stem to the terminal. In looking over these pieces of wood, notice how bud size increases and buds become closer together as you get closer to the terminal. For great scionwood, you want prominent, healthy buds, but those buds should be widely spaced to make grafting cuts easier.
    I always discard the terminal portion of the shoot when collecting scionwood. The terminal is crooked, has too many buds, and is nearly impossible to carve when grafting.
  On the other end of the shoot, the basal piece of wood has very small buds which are prone to falling off the stem (yellow arrow points to aborted bud scar). I'll save this piece of wood for grafting because the secondary buds can grow into new shoots. However, when I'm out grafting and have a pile of scions to choose from, I'll choose this type of wood only after I've run out of scions with more robust buds.

Thinning a pecan orchard in a single year.

$
0
0
      When to thin is one of the most difficult decisions a grower must face during the life of a pecan orchard. Over the past several years, I've documented our gradual approach to thinning a block of Kanza trees. But last week, we completed a more typical "once-over" tree thinning operation in a 4 acre cultivar trail (photo at right).
    This cultivar trial was originally planted at a 30 by 30 foot spacing back in 1991. After 24 years of tree growth the limbs of adjacent trees were getting close to touching and very little sunshine penetrated to the orchard floor in mid-summer. In fact, several portions of the orchard were actually past due for tree thinning. 
    Before cutting a single tree, I mapped out the entire orchard recording the locations of weak trees or trees badly injured by wind or ice storms. I knew I would be cutting down 50% of the trees during this once-over thinning operation. However, with map in hand, I could choose a thinning plan that would maximize the removal of "problem" trees.

    In thinning the grove, we removed odd-numbered trees in the first row. Even-numbered trees were removed from row two. In row three, we were back to removing odd-numbered trees. We continued this pattern across the entire block of trees.
    Once all the trees were cut, I could look across the field at a 45 degrees from the tree rows and see an entire diagonal row of trees had been cut (photo at left).
    After removing felled trees from the field, the orchard looked wide open with plenty of space for the remaining trees to grow wide canopies. The remaining trees are now spaced 42.4 feet apart.
   

Wood growth in a forked pecan tree

$
0
0
    Back when I was thinning trees out of our pecan breeding plot, I cut down a tree that four years earlier had been a forked tree. The photo at right shows the basal portion of the removed tree and you can see the tree wound left by removing the fork in the tree.
    Cutting down this tree gave me the opportunity to see how pecan wood growth is effected by a tree having two main trunks. In the photo at left the red arrows point to the centers of the two trunks that began growth back when this tree was a small sapling. The yellow arrow points to the bark inclusion that developed between the two trunks.
    Four years ago I pruned out one of the two main trunks. The bark inclusion stopped spreading and four years of solid wood grew all around the tree's circumference. 

    A bark inclusion forms between the two halves of a forked tree largely in response to wind. As wind moves the upper portion of the tree, the two halves of the tree are pulled apart, splitting open the wood.
    If you look closely at the growth rings of this tree, you will note that the rings are identical on both sides of the bark inclusion (photo above). This tells me that the growth ring was formed first then split apart later.

    It is interesting to look closely at the wood growth patterns of original two stems of this tree (photo at right). At first the two stems grew independently, each forming their own growth ring. As the two grew in diameter, the stems grafted together and developed a single, shared growth ring. However, as the tree grew taller and branched out to form a larger canopy, the wind started to pull on the two trunks taring them apart.
    If you every see a young tree develop a forked trunk, prune the tree to a single stem as soon as possible. Once pruned, the tree will grow new growth rings over any bark inclusions that may have started to develop.


Unequally yoked: grafting hickory on pecan and pecan on hickory.

$
0
0
    Pecan and hickory are closely related, both belonging to the genus, Carya.  Pecan and hickory are also graft compatible meaning scions from one species can be grafted successfully on a tree from another member of the Carya genus. The question becomes, should these type inter-specific grafts be made?
    Pecan is the fastest and largest growing species in the hickory family. Because of this fact, I often recommend that hickory nut enthusiasts graft their favorite hickory cultivars onto pecan roots. The vigor of the pecan rootstock pushes the hickory scion to grow faster and to start producing nuts earlier.
    The photo at right shows two hickory cultivars (smooth bark) grafted on to a single forked pecan tree. Note how the pecan portion of each graft union has already grown larger in diameter than the hickory tops.
    One word of caution. If this were my tree, I would have pruned out the fork in this tree long ago and kept just a single hickory cultivar.  As this tree grows larger, the chances of this tree breaking out in a wind storm only increases.

      I do not recommend grafting pecan onto hickory rootstock. Slow growing hickory will actually slow down the growth of a pecan scion and inhibit nut production. The photo at left shows what happens when a pecan scion is placed on a hickory root.  Once again the pecan portion of the tree out-grows the hickory portion. The tree becomes top heavy and the hickory roots have a hard time providing enough water and nutrients for the massive pecan top.
   It is tempting to graft pecan on to hickory seedlings because several species of hickory can tolerate drought-prone soils found on upland sites (as in the photo). Pecan, being a flood plain species, would struggle if planted directly in upland soil conditions. Unfortunately, grafting pecan onto hickory tree seedlings, already established on a upland site, will not make nut production from the pecan top any easier. The hickory root and the upland soil will never be able to provide the water needed by pecan scion to grow and fill out a nut crop. 


Pecan seedlings heading for advanced testing

$
0
0
    Twenty years ago I made some controlled crosses between several pecan cultivars. Over the past three years we have been evaluating the nuts produced by the seedling trees that grew from those crosses (photo at right). This year, I have collected scions from a select group of trees from our breeding project to be grafted into advanced trials. The advanced trials should give us a better idea of how these selections perform in terms of yield, precocity, alternate bearing and tree growth habit.
   Yesterday, I photographed the nuts from trees that will be entering advanced trials this year. When you look at each photo, be aware that the two inshell nuts were placed on different sides to give you a feel for overall nut shape. A table of the 2015 average nut weights and percent kernel for these selections is given at the bottom of this post.

KT 114
    This first group of selections all resulted from crosses made between Pawnee and Greenriver (photos at left).
KT 116

KT 156

KT169


KT 342
KT378

KT 129


    The next group of selection are the results of crosses made between Pawnee and Major.

KT 143

KT 149
KT 201

KT 178


   The last seedling to enter into advanced trials this year will be an open pollinated Kanza seedling.


Nut weight and percent kernel data for the 2015 crop season is given below.

Fire damage on young pecan tree

$
0
0
      The other day a grower called to see if he should burn off the pasture under his pecan trees. Early spring burning might be a tried and true method for invigorating Kansas grasslands but fire and pecan trees don't mix.
   Earlier this year I removed a fire damaged pecan tree from my farm. This gave me the opportunity to cut a cross section of the trunk to reveal the fire damage and how the tree responded to that damage (photo at right).
   The tree was located in a field of tall native grasses. When a grass fire moved through this field, it was pushed along by a strong southern wind. The south side of the trunk was exposed to such intensely high temperatures that the bark was singed and the cambium underneath was killed. The red arrow in the photo points to the burned portion of the trunk.
   In response to fire damage, the tree attempted to grow over the wounded area. Note how wide the wood growth rings are in the areas that are attempting to grow over the wound (marked A and B). This tree was moving quickly to seal over the wound. If this tree was left standing, it would have taken just a couple more years before these two fingers of wood growth to meet and grow together to completely seal over the burned portion if the trunk.
    Young pecan trees, with their relatively thin bark, are especially prone to fire damage. Older, mature trees with decades of bark thickness are more resistant to fire, however, these tree can also be severely damaged by fire. Keeping the pecan orchard mowed, thus minimizing the potential for a run-away grass fire, is the best method for preventing fire damage to you pecan orchard.    

The first signs of pecan tree bud growth

$
0
0
Surecrop, 17 March 2106
    This year we've been experiencing a warm and early spring. Over the past week, I've been watching pecan buds carefully to detect the first signs of bud expansion and growth. At this point only some trees are showing signs of bud swell while other are quite dormant.
   This morning I collected some terminal branches from several cultivars which will help me illustrate the first event in pecan bud development -- outer scale split. The twig I collected from a Surecrop tree (photo at right) had buds that were fully dormant. Each primary bud appears to be encased in a smooth, hard shell offically known as the outer scale.
Kanza, 17 March 2016


    The Kanza twig pictured at right shows the very first sign of bud swell. The outer bud scale on the upper-most bud has cracked open. (The shriveled stem above this bud is last years pedicle that held a cluster of nuts).

Peruque, 17 March 2016


  Once the outer scale cracks open, the scale drops off to reveal an expanding pecan bud covered by an inner scale. The photo of the Peruque terminal (at right) demonstrates that the outer scale split process begins with the terminal bud and continues sequentially down the stem.


Greenriver, 17 March 2016


   The photo at right of a Greenriver terminal shows what is revealed when the outer scale separates from the bud. Each bud contains a primary vegetative bud in the center surrounded on each side by smaller axillary buds containing catkins. The vegetative bud will eventually grow out into a new shoot that terminates in a cluster of pistillate flowers.
  

Fertilizing pecan trees in the spring

$
0
0
    Today we made our springtime fertilizer application (photo at right). Every spring, we rent a fertilizer spreader and carpet the entire orchard floor with nitrogen and potassium fertilizers. We applied 150 lbs. /acre urea fertilizer which contains 69 lbs./acre nitrogen. Mixed in with the nitrogen, we applied 100 lbs./acre potash (=60 lbs./acre potassium).  The applied cost of the nitrogen was $27.56/acre and the potassium was $17.75/acre. This spring we invested $45.31/acre in our pecan crop.
    For pecan growers with just a few trees you can calculate your springtime fertilizer needs by measuring the diameter of your trees. Apply 1/2 lb. of urea fertilizer for each inch of trunk diameter. In other words a 10 inch diameter tree should have 5 lbs. of urea spread over the tree's entire rooting zone. When it come to potash, apply 1/3 lb. of fertilizer per inch of trunk diameter.
    Many backyard pecan growers buy their fertilizer in bags containing a 10-10-10 mix of N, P and K. To apply the recommended levels nitrogen, 2.5 lbs. of 10-10-10 should be applied per inch of trunk diameter. Again, the fertilizer should be applied over the entire root zone.

Fresh sapsucker holes

$
0
0
    Every spring yellow-bellied sapsuckers fly through our area at this time of year drilling fresh holes in the bark of pecan trees (photo at right). These migrating members of the woodpecker family use their beaks to drill rows of shallow holes through the bark and into the sapwood. These holes are made at the very time when the sap is rising in pecan trees. In the photo at right, note that the holes have filled with tree sap. The birds will revisit their rows of freshly drilled holes and feed on the tree sap. Insects are also the attracted to the sap and become trapped in the sticky goo. This provides the sapsuckers with an additional food source--sap coated insects.  In a few weeks, the sapsuckers will be leaving our area to move northwards in search of additional trees with strong springtime sap flows.

    Yellow-bellied sapsuckers seem to have very specific tastes when it comes to pecan trees. They seem to prefer certain pecan cultivars and return to those same trees year after year. The photo at left shows a series of holes created several years ago. These old holes are on the same tree as the fresh holes I found on upper branches higher in the tree and pictured above.  What is most interesting is that the sapsuckers attacked only this Mullahy pecan tree and not any of the dozen or so other cultivars found close by. Stuart trees are also preferred by sapsuckers.

Pecan tree starting to push

$
0
0
    During yesterday's this beautiful spring weather, I took a short walk around my pecan plantings and noticed that some trees were starting to push open new buds. The photo at right was taken yesterday and shows the emerging buds of a Faith pecan tree. The inner scales have split open and dropped to the ground to reveal a large, green vegetative bud surrounded by smaller buds containing catkins.
    During my walk-about, I also found a Jayhawk tree with bright green buds (photo at left). Seeing green buds this early in April makes me a little nervous. I've already loss a large part of my peach crop and part of my pear crop to late-spring freezes last month and we are not statistically past the danger of additional cold weather. Pecan buds at this of development can withstand temperatures of 26 degrees F (-3 C) and thankfully the 10 day forecast looks like we'll stay above the freezing mark.
  
    Other pecan cultivars were just starting to split open their inner scales. Kanza buds look like they are wearing little helmets as the inner bud scale pops free from the expanding bud beneath (photo at right).  Gardner trees looked to be at the same bud stage as Kanza.
     Greenriver buds have swollen but the inner bud scale was still covering the entire bud (photo at left). Hark and Lakota buds appeared much like Greenriver, still fully covered by the inner scale.

Why we call it sapwood

$
0
0

   Last week, we removed a couple of large native pecan trees that were shading the growth of some young trees in an adjacent planting. After cutting the trees, we left the stumps in place for a couple of days while we hauled off the brush. One day after cutting the trees down, you could see large amounts of tree sap flowing from the outer growth rings of the trunk (photo above). In every case, the sap flow was limited to the outer 4 to 5 growth rings. The vast majority of the wood in the tree stump remained relatively dry.
    This high flow of sap from the outer-most layers of wood is the origin of the term "sapwood". However, the term sapwood means something entirely different to those that cut pecan trees for lumber. The sapwood refers to the lighter, almost white colored wood on the outer portion of the trunk. The heartwood of pecan trees is found in the center of the tree and is typically brown in color. You can see darker colored heartwood at the far right in the photo above.

     Next time you cut down a pecan tree, look to see if you can identify the different tissues that make up a tree's trunk. In the photo above, I've labeled the important tissues.  Starting on the left you can see several annual rings of wood tissue. This photo was taken just moments after the tree was felled and you can already see wet spots developing around the largest pores in the outer-most growth rings. Botanically, the wood of a pecan tree is xylem tissue which is responsible for conducting water from the roots upwards to the leaves. As wood tissue ages, becoming increasingly buried under new layers of wood (annual growth rings), the pores in the wood becomes clogged with lignin. Lignin blocks water flow but increases wood strength and rot resistance.
    Outside the wood is a narrow band of cells called the cambium (red arrow above). Every spring these cells become active creating new wood cells on one side and new bark cells on the other. The activity of the cambium layer is responsible for the tree's annual increase in diameter.
   On a mature pecan tree, you will find two distinct layers of bark. The inner bark or phloem functions to transport carbohydrates from the leaves downward to all other portions of the tree (branches, trunk, roots). The outer bark provides protection for the living tissues underneath. The outer bark acts as a vapor barrier to prevent moisture loss and as insulation against heat and cold.


When is it time to graft pecan trees?

$
0
0
    We have a small planting of seedling pecan trees that I plan on grafting this spring. All the trees in this planting are open-pollinated Kanza seedlings. This morning, I looked over the field and noticed that some trees in the planting had entered the leaf burst stage (photo at right).  Since I'll be using a bark graft to establish selections from our breedingprojectin this field, seeing trees in the leaf burst stage has made me anxious to start carving scions and placing grafts.  You see, leaf burst is the signal I use to determine when the bark of the tree will slip enough to allow scion insertion.
     However, looking across the entire field I noticed that bud development varied widely among seedling rootstock trees. Right next to a tree in leaf burst, I found a tree in the bud enlargement phase of bud development (photo at left). If I tried to place a bark graft on this tree, I'd probably find that the bark on the main trunk would not slip and I would have trouble inserting a scion. A tree at this stage of bud development is just not ready for bark grafting.
    Moving down the row of seedling trees I found several trees in the inner-scale split stage of bud development (photo at right). If I was planning to use a three-flap graft, this would be the perfect stage of bud development to start grafting. However, the trees in this block have all grown much too large in size to effectively use a three-flap graft. Since the bark graft is the preferred method to use on trees with trucks that range from 1 to 4 inches in diameter, I will need to wait a little longer before attempting a bark graft on the tree pictured at right.  
     Even though a handful of trees in this block of Kanza seedlings have leafed out far enough for effective bark grafting, I'll probably wait another week before grafting. This will allow the other trees in the planting to catch up in terms of bud development and allow me to graft every tree in every row all in a single day. That way I'll be sure to get every tree grafted and grafted to the right breeding project selection.

Pecan buds push open and reveal catkins

$
0
0
City Park, protogynous
  Yesterday, the sun broke through the clouds so I grabbed my camera to photograph emerging pecan buds. My goal was to concentrate on recording the growth stage and flowering habit of a dozen pecan cultivars that we haven't gained a lot of experience with at the Pecan Experiment Field. When you look over the photos published in this post,  you can see that some cultivars have popped open earlier than others. In addition, you can now distinguish protandrous flowering cultivars (early pollen) from protogynous cultivars (late pollen). Protandrous cultivars have short thick catkins that emerge at the same time as new shoots. The catkins on protogynous cultivars emerge after leaf brust and are long and thin in appearance. I have captioned each photo in this post with the cultivar name and the flowering type for that cultivar. Remember, you can see an enlarged version of each photo by simply clicking on one of the images.


Goosepond, protogynous


Hark, protandrous
KT143, protandrous

Lucas, protogynous

Mullahy, protogynous
Oswego, protogynous

Surecrop, protogynous

SWB617, protandrous


Waccamaw, protandrous
Warren 346, protandrous

Yates 68, Protandrous


Grafting a pasture pecan tree

$
0
0
    When I stopped cutting hay on a portion of my farm, I discovered several volunteer pecan trees growing up through the grass. These trees had been mowed off at ground level every year for over a decade. So when I finally allowed the trees to grow, up came multiple stems all growing from the same root (photo at right). The growth rate on this multi-stemmed tree was impressive--over six feet of new top growth in just two years. These make great trees for grafting.
    My first step was to trim down the thicket of pecan stems down to a single tree trunk (photo at left). I kept the stem with the largest trunk diameter and cut all other stems of at ground level.
    I then cut the remaining trunk off at about 18 inches above ground level to prepare the stock for inserting a bark graft (photo at right). I have discussed how I make a bark graft in a previous post (click here) but in grafting this tree I had to make several adjustments to my technique to ensure grafting success. If you are unfamiliar with my bark grafting technique, I would suggest reading my previous post before continuing with this article.

    The diameter of the tree I choose to graft was relatively small for a bark graft (1.25 inches) but I found a flat side on one side of the stock that would make a good spot for inserting a scion. I always place my scions on the left side of the incision in the stock's bark so I made my cut on the right edge of the flat spot (photo at left). 

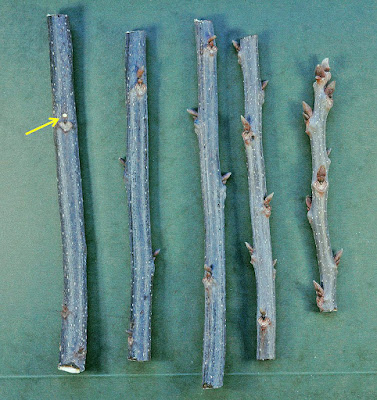
    In choosing a scion for grafting, I always make sure I have two large, plump buds near the top of the stick (photo at right). When carving the scion to fit under the bark of the stock, I always make sure handle the wood in such a way as to not break off either of these two very important buds. 

    Before taking my knife to the scion I always take a quick look at the base of the scion. Making the cuts in the scion and then fitting the scion into the stock is always easier when the wood is straight. However, many times when you pick up a piece of scionwood, the wood seems to grow in a zig-zag pattern, changing direction at each bud. To find a straight portion of the scion to make my cut, I simply rotate the scion until I find a straight side. In the series of photos at left, you can see how I rolled the scion around until the scion magically straightens out.

    After finding the strait side of the scion, I carved the deep cut into the scion. In making this cut, I noticed a bump near the base of the stick (yellow arrow at right). This bump turned out to be leaf scar tissue at the base of a bud (lower photo at right). A bud and leaf scar at the base of the scion does not render this scion useless but it does mean I'll need to be careful when making the next two cuts on the scion.
   I start by removing the bud near the base with my knife (photos at left). This will allow me to make the shallow cut on the back side of the scion without running into a protruding bud.

    I carved the shallow cut on the back side of the scion just as I usually do (photo at right). After making this cut, you can still see an obvious bump sticking out of the side of the scion. This bump is the remnants of the leaf scar  that was just below the bud I previously removed in the photos above. 


    When it came time to make the 90 degree cut on the edge of the scion I made sure to straighten out the edge of the scion and remove part of the leaf scar bump. In the photo at left, you can see that I cut deeper into the wood at the point of the leaf scar  but now the straightened scion will fit snugly against the bark of the stock.

    The leaf scar bump didn't disappear completely. I inserted the scion into the stock and everything fit according to plan. However, the leaf scar bump is still visible as it peeks out from under the split in the stock's bark (photo at right). I placed staples both above and below the bump to make sure the bark of the stock formed around the scion. 

    Before inserting the scion into the stock, I noticed that the cut stock tree was "bleeding".  Since trees don't contain blood, this phenomenon is actually called excessive sap flow and can cause graft failure if left unchecked. In the photo at left, sap flowed out of the cut surface of the stock tree, down a bark fissure, and then created a wet spot on the side of the stock.
    To prevent graft failure from excessive sap flow, I cut sap relieve grooves on either side of the stock tree using my pruning saw. Each groove is cut half way around the stem and the grooves are made 1.5 to 2 inches apart vertically (photo at right). The grooves are cut just deep enough to enter the sap wood.  

   By cutting sap relieve grooves, the excessive sap flows out of the groves and will not reach the graft union to inhibit callus formation. In the photo at left, you can see how much sap has leaked out of the sap relieve groove  just during the time it took me to insert the scion, wrap the graft, and attache a bird perch.
    In 2-3 days, sap will stop flowing from the sap relieve grooves and the tree will begin to callus over the wounds. At the same time, the tree will also begin forming the callus tissues needed to make a successful graft union. 

    Before leaving my new graft, I placed a deer cage over the tree (photo at right). This cage will prevent browsing deer from destroying the new buds as they emerge from the scion. With all the stored up energy in the root system of the pasture pecan tree, I will expect this graft to take off and grow 4-5 feet this summer. It will be fun to watch!

Pecan pollination season rapidly approaches

$
0
0
   Yesterday, I took a quick trip around the Pecan Experiment Field to check for pistillate flowers (female flowers) on our pecan trees. The catkins or the male flowers have been out for some time but the female flowers are just now starting to show themselves at the ends of new shoots on protogynous cultivars. Lets take a look at the 2016 pecan pollination season as of 4 May 2016.

Pawnee catkins
   The first thing I noticed was that early pollen shedding cultivars (protandrous), like Pawnee, had large fully developed pollen sacs (photo at right). The pollen sacs will eventually turn yellow just before they split open and release millions of pollen grains into the air.

Kanza catkins


    In contrast, late pollen shedding cultivars (protogynous) have long narrow catkins with pollen sacs that are still far from obtaining full size (photo at left). It will be a couple of weeks before pollen is released from these Kanza catkins.

City Park pistillate flower cluster
   The only pistillate flowers I could find yesterday appeared on protogynous cultivars. In looking at several cultivars, I found flower clusters in several stages of development. Pistillate flowers on some cultivars were just beginning to peak out of a terminal's new growth (City Park, photo at right), while others had fully formed flower clusters (Mullahy, photo below). I was very glad to see a good pistillate flower crop developing on my Kanza trees (photo below).

Mullahy pistillate flower cluster
 

Kanza pistillate flower cluster

Mid-way through pecan pollination season

$
0
0
  The last few days of warm sunshine has really promoted the progress of pecan pollination season. Cultivars with the protandrous flowering habit (pollen early, pistillate flowers late) have released or are currently releasing pollen form fully ripe catkins. The photo at right shows Gardner catkins with many open pollen sacs that have started to turn brown in color since all the pollen has already been released.
 
Looking over at the terminals of the Gardner tree's new growth I found numerous clusters of pistillate flowers (photo at left).  Gardner, like all protandrous cultivars, produce pistillate flowers late in the pollination season. The stigmas of Gardner flowers turn red and glossy when receptive to pollen. The flowers pictured at left are just about ready to capture pollen from the air.

   In contrast, the pistillate flowers of protogynous cultivars have already been pollinated. The photo at right shows a cluster of Posey pistillate flowers.  The stigmas of Posey flowers are green in color but note the the upper edges of the stigmas are starting to turn brown and look dry. This is the first sign that these pistillate flowers have received pollen and are on their way to setting a nut crop.

  The pollen sacs on Posey catkins are only now starting to turn from green to yellow (photo at left). It won't be long before these pollen sacs will begin to open and release the pollen needed to fertilize the pistillate flowers of protandrous cultivars like Gardner.
Viewing all 395 articles
Browse latest View live